Well, breadboard MOPA seemed like a very interesting idea, it was absolutely unusual for me - I never used wooden chassis (breadboard) without any metal shielding before. Second problem - I'd started this project too late, for only one week before the SKN.
To my surprise, I got my firefly finished and fired-up during Straight Key Night! Without any success - there was no SKN participants over here. But what done is done and I was so glad to hear many "loud and clear" signal reports and heartwarming words from EU CW stations. Maybe next SKN, VE and W stations will make a sked to work UU1CC.

DESCRIPTION
The complete circuit diagram is shown below. It is
nothing special - choke loaded triode crystal oscillator and
neutralised power amplifier. The antenna tuning circuit is arranged
for the low-impedance loading such as Marconi antenna or coaxial
(twisted line) feeding dipole.
Slightly less common point of this design is a bias step-by-step keying circuit from the old Soviet handbook. Yes, i assume that such solution (especially germanium diode usage) is not so "stylish" for the golden-era wooden MOPA, but signal quality has a vital importance in my case - i planned to try this QRP baby with the powerful tube amplifier on the our local club station sometime.

So, how does this keying method work and why I chose one as a best signal improvement? QRX, I'm trying to translate the handbook article...
Lets go: "The differential keying circuit is shown on blah-blah... At the moment of the key pressing capacitor C1 (0.25uF) quickly discharging through diode VD1 and resistor R2 (1k), thenceforth crystal oscillator starts to oscillate. Hereafter capacitor C2 (0.03uF) slowly discharging via the R3 (100k) and amplifier stage opens. Then, when the key unpressed, capacitor C2 (0.03uF) charging through the same resistor (100k), but C1 (0.25uF, much more than C2) - via high resistance of the R4 (100k). That is why oscillator starts before and stops after the amplifier".
Is it clear? I'm not quite sure - too complex for understanding even without my terrific translation. Making long story short, this magic circuit provide same start-stop timings for the amplifier, but different ones for the oscillator. As a result - no chirps, no clicks on the air and very smooth keying.
PARTS
I've used a common vintage parts from the 1940s up to the 1955,
in particular resistors, paper and mica condensers, vacuum tubes. These tubes
are Soviet analogs of the same RCA ones - native 6L6 has been
replaced with the 6n3 tube from the 1942 (can be replaced with the
more "contemporary" types such as 6n3c, 6n3c-EB etc.), in
the triode oscillator stage i used 6c2c (analog of the 6J5-GT, best
choice) and my lovely beauty 6c5c (analog of the 6C5-GT, pretty tube,
but has slightly less output). Just for fun - I played with the Magic
Eye Tube in the oscillator circuit - so pretty outlook, but very low
level of the oscillation.As a XTAL I used a bunch of an ancient Soviet rocks from the aircraft-mobile military VHF radio called "RSIU" - these crystals has been used in that station for the fast frequency switching. Saying strictly, I used only 7Mc native RSIU rocks, for the 3.5Mc band I made replacements using RSIU "brown tubes" (c) VE3AWA terminology) and penned tiny modern crystals.
In the keying circuit I used vintage germanium diode D7 - such diodes has been used in the rectifiers of the old Soviet radios and TV-sets in the early 1950s. There are many types of diodes can be used in this circuit - from the modern silicon rectifier-type diodes up to the ancient selenium plates.
Well, read the entire part list below:
| Name | Value | Description |
|---|---|---|
| R1 | 9k1 | 1W |
| R2 | 1k | 0.5W |
| R3 | 100k | 0.5W |
| R4 | 100k | 0.5W |
| R5 | 47k | 0.5W |
| R6 | 33k | 0.5W |
| C1 | 0.25 | Paper 200V |
| C2 | 0.03 | Paper 200V |
| C3 | 6800 | Mica 500V |
| C4 | 6800 | Mica 500V |
| C5 | 220 | Mica 500V |
| C6 | 1-15 | Ceramic or air-spaced trimmer |
| C7 | 2x300 | Twin sections in series, rotor not connected |
| V1 | 6J5, 6C5(GT) | Analogs 6c2c and 6c5c |
| V2 | 6L6 | Analog 6n3 has been used |
| VD1 | D7 | Vintage germanium rectifier diode |
| Q1 | 7Mc, 3.5Mc | FT-243 (nearly the same xUSSR rocks has been used) |
| L1 | Choke | RF Choke |
| L2 | - | See below |
| L3 | - | See below |
Winding the coil on the non-pill bottle I placed in the separate chapter for several reasons.
ALCOCOIL™
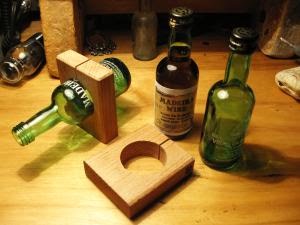
First of all, this bootlegger's style in the coil-winding art has a great importance for the Depression-era MOPA builders. With little spare cash Novice HAMs had to use some unusual parts (such as father's bottles or mom's hair rollers) for the coil winding. On the other hand, there was much more dry bottles than hair rollers everywhere, on any attic because the Eighteenth Amendment.
 Second reason is obvious:
I like the Madeira wine - it's not my main hobby, but I like it, thrust me.
Who does not love wine, wife and song, will be a fool for his lifelong! I would like to add the Morse code to this great assertion, but rhyme becomes really ugly.
And at very last:
"Putting the fire back in firebottles" - this is our slogan, isn't it? But who said that Madeira bottle can't become a Firebottle once upon a time?

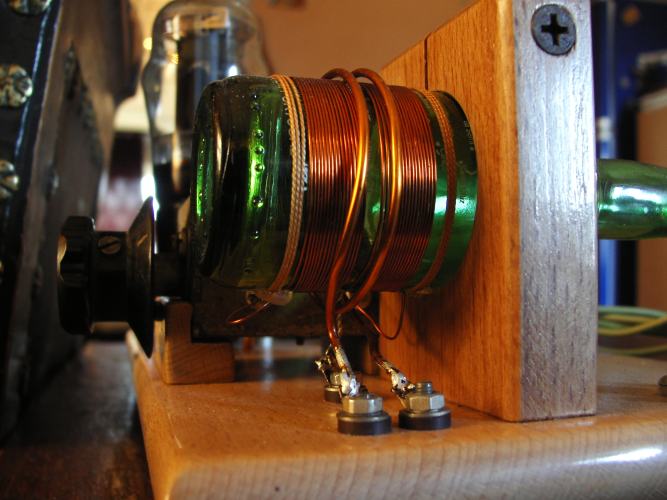
Souvenir wine bottle 1 7/16 inch. diameter has been used as a coil form. The ends of winding (including center tap) tied using a thin strip of cardboard as shown on the animated image. It is common solution for winding on slippery surfaces, such method ensures strong fixation without drilling holes.

Antenna coil wound over center part of the plate coil and has 2 turns of strong enameled wire.
CONSTRUCTION
The SKN MOPA transmitter has been mounted on a dry varnished beech board 5 1/2 in. x 11 in. The arrangement of the various parts is shown on the following photographs.
The keying circuit completely mounted on the small Bakelite board, bias resistors R5 and R6 soldered between this board ant tube sockets. As I mentioned before and as shown on the photograph below, rotor of the plate capacitor not connected at all - only stator blades has been soldered. One stator soldered to the tube's plate and the end of the coil winding, second one soldered to the another end of the coil and neutralizing condenser C6.

A wooden cylinders was screwed at the corners on the underside of the baseboard, so as to elevate it from the table top to permit mounting the bypass capacitors C3 and C4 (6800). The various montage wires has been placed also under the board. I have a small amount of the rubber cotton covered varnished wires (remained from the military surplus antenna), so I'd used these good-looking wires in the my MOPA for more "ancient" outlook.

OPERATION
What can I say? It is really "plug'n'play" device - just plugging the XTAL and come on. Measured power was 17 watts on 80 meter band, slightly less (14 watts) on the 40m. Power output depends on crystal activity and triode used in the oscillator - when I played with The Magic Eye Tube, I got 5 watts on the 80m band at all.During the Straight Key Night 1 January 2008 I fired up this transmitter at the 40m band using the Long Wire antenna 270 feet long, but 25 high only. Here is my New Year roster below:
| CallSign | UTC | Sent | Rcvd | Comments |
|---|---|---|---|---|
| SV1DPI | 01.26 | 599 | 599 | Kostas |
| UA9MBR | 01.30 | 599 | 579 | Sergey, Omsk |
| UA4IW | 01.39 | 599 | 599 | Vasiliy, Samara |
| UR5THM | 01.58 | 599 | 599 | Sergey |
| SM5BVF | 02.28 | 589 | 579 | Henry, nr. Stockholm |
| UA4LF | 03.30 | 579 | 559 | Vladimir, Ulyanovsk, Homebrew |
| DL4VM/QRP | 03.50 | 589 | 589 | Tom, Saar, 5W |
| DK1KH | 03.53 | 599 | 599 | Klaus, Munich |
| SV1DOI | 04.02 | 589 | 559 | Sotos, Piraeus |
| UA3CS | 04.09 | 599 | 599 | Sergey, Pushkino |
| UK8IZ | 04.29 | 599 | 599 | Yury, Samarkand |
| OK1US | 04.57 | 599 | 599 | Jiri, Budijovice, Straight Key |
| DL1NKS | 05.05 | 589 | 599 | Stefan, nr. Frankfurt |
| F9KP | 06.00 | 599 | 599 | Paul, Ply |
As I said before, I use several rocks on the 80, 40 and 30 meter bands. Here they are: 3512, 3561.5, 7010, 7032, 7051, 7055, 10122.2 kc. My preferable frequencies are 7051 kc and 10122.2 kc, near the SKCC frequency 7054.5 I use my 100W tube amplifier. Check these points time to time and who knows?
ATTENTION! These simple rules (TNX to Steve WD8DAS) can help You stay alive:
|

5 comments :
Very very nice! I'll listen for your signals. 73 Ric K5RIX
Andy,
Wonderful web pages. Lat year, I made a 6J5/6L6 MOPA from your schematic. Uses two metal tubes so it is glow-less. But it does have the "retro" look.
Your "passive differential keying" circuit works like a charm.
TNX es &#
Chas W9SAY
SKCC 1158T
It's so pleasure to read it, Chas! And I'm very interested to look a photo - if you have one, please send it to "ur3ijc (at) gmail (dot) com".
Hope to meet you one Straight Key Night on this radio.
73
Andy UU1CC
SKCC 3072C
Great work, Andy. I'll be mentioning the page and your page about the 6E5 variant in my Boosted Pierce page at http://mysite.verizon.net/dpnewkirk/ej/boosted_pierce/. A question: What's the performance difference with and without neutralization? Neutralizing a Boosted Pierce final is something I've considered for some time in the hope of cutting down reaction from final plate tuning and decreasing the RF level at the crystal.
Best regards,
Dave
amateur radio W9VES
http://mysite.verizon.net/dpnewkirk/ej/
Hello David.
I just mailed an answer, but in short:
I have a big problems with high RF level on crystal and crystal overheating on 30m band. Now I think that main mistake was to use a tiny modern quartz on this band. Anyway, neutralization solved this problem completely.
73! de UU1CC
Post a Comment